Showing posts with label DIY. Show all posts

Friday, October 25, 2013

Roasted Habanero Hot Sauce


Those scotch bonnets growing in the garden? Oh they were habanero peppers. One of those instances where finding the labels for the plants should have been done before testing the fruit. No lasting damage done, except to the yogourt tub I attacked while my head was on fire.


MomBlom's household has never been one for spicy food, but with family additions we've been angling for the hotter things in life. As such, a plentiful supply of hot peppers was very exciting, but a little perplexing. What do we do with this much spice? We preserve'em!

As a perfect way to test out this preserving book I picked out at the gift show, I figured I'd get the peppers canned or jarred and see what to do with them next. First thing's first, they're apparently better roasted. That's easy to do! Just wash them and dry them with a paper towel, and lay them on some aluminum foil.


Sprinkle them with oil, place a rack in the top third of the oven, and broil the peppers until they're blistered and blackening.

Nestle them in paper towel (for the oil) until they cool, then slice off the stems (and seeds if you want, but I left them in).

Every time I did this I knew there was a whole new batch of peppers on its way, so instead of going right to the preserving process, I froze the peppers at this point. I don't have the book in front of me, but I think it says that they're good frozen for six months or so. At least three.


When I had enough habanero in the freezer, I got myself a brand new canner, some nifty jars, and a six-pack.

According to the book though, peppers aren't great to preserve on their own. They require a crazy method of canning that even this baby can't do. But sauces and chutneys that are high in acid can be preserved perfectly well with the boiling-water method, so I opted for a hot sauce recipe with plenty of vinegar. I've got the recipe on Pinterest, but for the sake of convenience, I found it here.


One thing I didn't know: the main ingredient in most hot sauces is carrots!


I think next year, if for some reason we grow this many pepper plants, I'll try a batch with fresh peppers. These just look so mushy and sad.


Here's the hot sauce post-puree and pre-simmer. I'm really curious as to the final product. The hot sauce recipe suggests simmering for five minutes to give a bit more of a liquid consistency, although I didn't notice much of a difference. The thing is, I've made two batches now, and each time I didn't have quite enough to fill the last jar. This means the preserving process wouldn't work, so those leftovers just go into the fridge to be eaten by me on everything. But I've yet to hear back what the finished preserved sauce is like.


The preserving process itself is really fun, because it seems so clinical and I like that in my kitchen. The dimensions of this canner make me SO ANGRY, but my first instinct to get squat, wide-mouthed jars was a good one. The boiling-water method is pretty standard and can easily be found on the internet, I'm sure. I got it from a book which makes me feel special, but then that book doesn't have a recipe for hot sauce, and the recipe I used doesn't tell you how long to boil the jars for. I made do with instructions for a tomato-sweet pepper chutney, which seemed to have most of the same ingredients, and boiled the filled jars for 25 minutes. That's why I don't know exactly how the finished product will taste; only the onions, garlic, and carrots are really cooked in the recipe, so I don't know what will happen to the heat or consistency after being boiled for another 25 minutes. 

It won't kill anybody though, I know that.

Wednesday, May 15, 2013

Preparations for a Wedding


Erin and Andrew's wedding is just around the corner now, and it's keeping the crafting hands busy. First thing when I got back to Waterloo was the wedding shower! There was a food and drinks table with jumbo straws that I wish I had stolen every time I have an avocado smoothie (a new favourite).


And a Bronwyn Snyder cake which, despite worries, was delicious. But the sudden realization dawns that I never got a strawberry... 


Some BORING punch. Actually it was delicious AND there were mimosas outside.


But all I really did was provide transport and show up, basically. Oh, and tack up some flowers in doorways.


Hannah, on the other hand, cross-stitched badges for everyone.


AND made adorable cupcakes! So it's almost like you were there now, isn't it? Hm?


In other news, I've been helping out some since then. I got my sewing machine all oiled up! I am way more excited about this than most things. That sewing machine is a good reference point for me in life.


In any case, I brought it over to Erin's for some quilting madness!!!!!!!!


We got all of the rows done so it shouldn't take too much more time to finish, because of Erin's sensible choice of quilting method: knots!


And, during downtimes, putting together giant paper flowers has taken over all other duties. These are amazing. Instructions available here and I highly recommend making a bunch of these without having any purpose in mind. They're fun.

Sunday, April 28, 2013

Impulse Crafting


It occurred to me a few months ago that I can do cameos of more than just people, but I didn't have the time or motivation to go out and buy any materials. I figured I'd wait until I got back to my Ontario studio, and it turns out I didn't have to wait very long! I would have liked to maybe try a colour other than black, but that would mean going to the store when everything else was within reach.

So I made this today. 

I also notice that it's been nearly a month since my last interesting thing. That's not true, because everything's changed. Everything's overwhelmingly up the air, but without classes or homework, I guess I've got no excuse not to tell you about the lasagna I made last Easter. I'll get to it, don't worry.

Update: I have a confession about this cameo. You might notice that the antlers are looking a little shaky. This isn't because I've cut down my caffeine intake, but because I apparently never put the brushes away last time I cleaned them, and left them in the bathroom. Since I haven't lived here in the last eight months, obviously the brushes had to go somewhere that wasn't in the toothbrush holder, and so they went on my shelf in the hutch that fits over the toilet. So... when I was blearily looking for some allergy medication, I dropped my tiniest brush in the toilet and couldn't bring myself to do anything but throw it away. Thought I was careful enough not to need it. Guess not.

Wednesday, January 30, 2013

I Mean it.

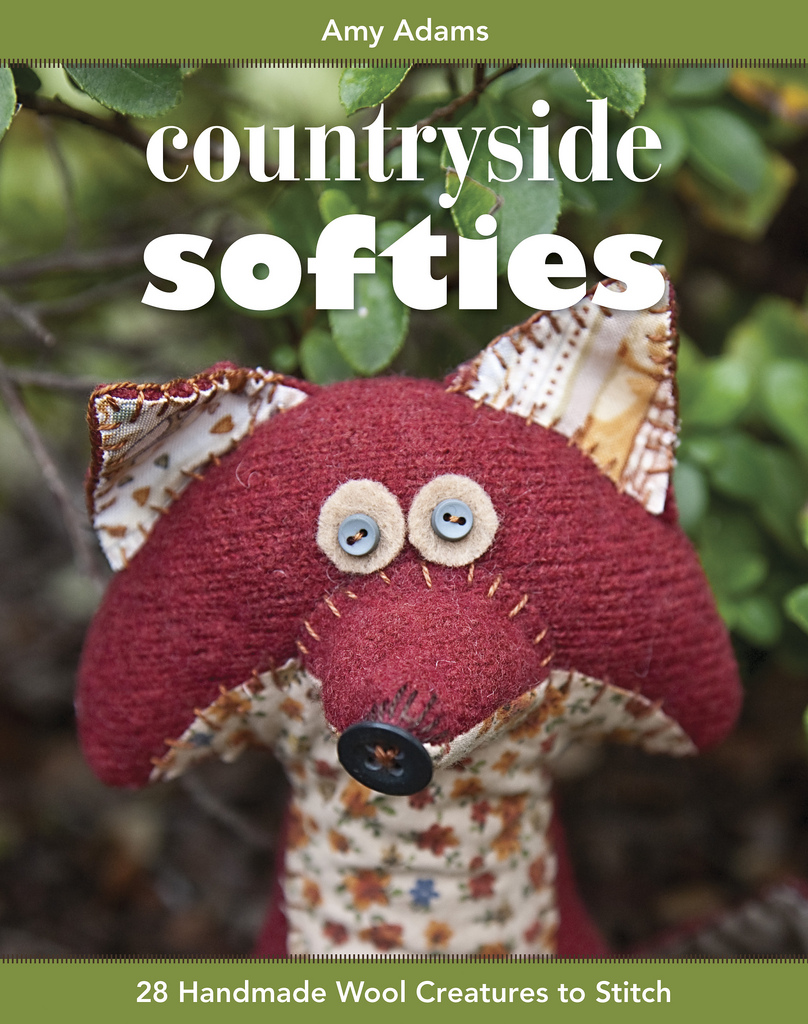
Countryside Softies

If someone buys me this book, I promise they will get a stuffed fox within the month. I'm so serious that I wrote this post in HTML. Just click that image, I dare ya.

Wednesday, January 23, 2013

New Sleeve for a New Laptop


I've been knitting for years now, and I did teach myself how. But until recently, knitting patterns of any kind had me stumped. I think, generally, it's because I don't have the patience to figure out the gauge of the yarn and needles, but once I've got some projects done, maybe I should do some gauge-knitting. Then I could make sweaters and things! But I had to get the terminology down. I figured I'd start with some lacy patterns, so I could learn some tricks, and still work on projects where I could judge the size of the finished product just by looking at it. So I made myself a laptop sleeve!

It's problematic. I love the colour, and the cathedral-like lace turned out perfectly, but... It's too big. And not only that, it's also stretchy. And the laptop slips around in the case so much that I can't hold it without feeling like the whole computer is just going to slip out and break when I haven't even had it for a month. I feel like this even when the closed part is on the bottom. So now, I've got the sleeve lining my otherwise unlined laptop pocket in my knapsack. A complete waste, if you ask me.

Perhaps if I block it, it'll shrink and lose some of its give? I don't know. I'm on to bigger things now anyway.

And another thing: All day I've been wondering what's so special about January 23rd. Just realized: isn't today the statistically worst day of the year? Sigh. Sounds about right. At least my dragonfly earrings make me cool friends on the Skytrain, and there's nothing wrong with having an unwatched episode of Downton Abbey kicking around one's computer either. If only I wasn't so... tired...

Thursday, October 4, 2012

Knitting Detail

 Knitting photos are hard. But I tried, which is the important thing. This is my new neckwarmer in the making. I have, of course, begun a new knitting project, as I do, so I've had to opt into wearing my ornate Indian shawl as a scarf for the last few days. It's pretty and I love using it, but my clumsiness with caffeinated beverages has made me nervous about having and using nice things. In any case! I started this neckwarmer as I usually do, which is to cast on whatever looks right and to continue without any sort of written pattern. I don't know how many stitches there are, but for this you need to cast on a multiple of four. So I began, and I got bored, and decided to make it ribbed: knitting four and purling four. That also got boring quickly, even with the addition of the light green, so I decided to switch the ribs up a bit. Looks like technical fabric or whatever you call it. 
 But it's still super easy, and I knit it when I get tired of following the crazy pattern I'm doing for my other project. All you need is a double pointed needle. Knit two, then slip the next two knit stitches onto the double pointed needle.
 Now ignore the double pointed needle and purl two.
Slip the next two purl stitches onto your double pointed needle. Ignore it and knit two, then purl the stitches on your double pointed needle. Continue in this vein all along the row. Once finished, you can continue knitting four and purling four for a few rows before getting your DPN out again. Should look like this, eventually:
Thinking about this too much just makes me want to do different things with it, like making subtly obscene little openings, or making the exes cross or naughty things like that.

So instead I'll think about pumpkins like I did for much of management class, and about my future as a legislative assembly transcription editor.

In all honesty though, I'm getting feelings about the possibilities of visual aesthetics in literary publications that I just can't ignore. I wish I'd been able to pay more attention to the guest speaker (Haig Armen) last week about interaction design, but alas. Life and other homework, huh? But really, this thinking as well as the new Wrinkle in Time graphic novel that's out are making my mind buzz, and I realize that as much as I was brought up to (appear to) think that graphic novels were inferior, I loves me some fantastic illustration. I know everyone probably does, but I just can't stress enough how important the visual experience of a story can be. So I have three branches that I would love to follow from this degree: the first is Taschen, which started out as a comic book shop and is now, of course, well known for its prolific output of art books and other such things. Plus they're based in Cologne which would be super convenient for me. Second, I'd absolutely love to go to Drawn & Quarterly, because holy heck how awesome would that be?! And third, maybe I'll just go into cookbooks and crafting magazine editorial. But that's so 'me' that it's boring, you know?

I keep thinking that these sorts of places should be reserved for the more design-minded folks, but my fumbling technological skills are all that are holding me back. I did do some of the preliminary work on David Collier's book of Hamilton-themed drawings. I don't even know what the official title or release date is though. And I probably would feel more a part of it if I hadn't been going into W&W only once a week by that point. Ah, well. I think it's time for some wine. Yes.

Saturday, September 29, 2012

Quilting Detail

 I figured maybe instead of just throwing pictures up of all my projects (because doing that every week would be really boring), maybe I'll show you HOW I make each one of them. Starting with the quilt, since a couple of people have been curious about that. Usually I sit on my bed, throw on some Netflix, and hoop up the next square I'm going to quilt. In this case, it'll be that boring grey square in the middle. These squares are very simple to do, just straight lines to make a smaller square inside.

 Next step is to measure half an inch inside whichever line you want to start with. Of course, you always want to start your quilting in the middle, so it's always better to start with whatever part of the square is closest to the middle. in this case it's the top left corner, so I'll be going from left to right.
 Mark the line with a piece of masking tape so you know you'll be making a straight line.
 Mark your start and end points.
 Clearly I've used the same piece of tape several times, so I have to start getting creative to keep track of what I'm doing. It gets messy quickly.
 Then take your needle and make even running stitches along the line. This is my favourite needle because it's bent in the most convenient way. I don't what I'll do if I ever lose it. Before you begin you want to make a small knot in the in the thread, which you'll pull through the top layer of the quilt only, so it sits nicely inside and keeps everything in place.
And that's finished!

Saturday, September 15, 2012

AGAIN!

Again with the making crafts out of an ENTIRE BALL OF YARN.

This one actually isn't so bad because you can just stick a pine cone in the top and take it out after Halloween. Orange isn't SUCH a bad colour.

But then there's the suggestion of glue-gunning it in. WHY?! NO! DON'T! If you don't actually knit and won't use the yarn give it to me! I'll use anything! I can't afford tons of yarn! I'll do pretty things! Things that require more styling than putting balls in a basket!

And again, this one really isn't so bad. But if I EVER. see another yarn ball wreath, I WILL confiscate all of the crafting supplies I find at the scene.

Thursday, December 22, 2011

Hot Beartatos!


I'm bad at telling people how to do stuff. However, the pattern I used for the potholders was found here so in case you get confused, which you inevitably will, go there.

First you need brown cotton fabric, light brown cotton fabric, black embroidery floss, some cotton batting, and some thermal lining stuff. At the store they kept calling it Thermalin, but on the receipt it says thermoplus? I dunno. The employees looked at me, got confused, tried to sell me fabric to cover an ironing board, then suggested I go to the dollar store, buy oven mitts, and cut them up... I just couldn't do that because a) cheating and b) most oven mitts aren't circular. Plus most potholders are quilted, so what was I supposed to do? They asked the big boss of oven mitts, who said "just use this" which turned out to be a thermal fabric that was right under the cutting table we happened to be at. Funny.


Oh, you'll also need a plate or bowl (something circular) and maybe something ovally. I sort of free-handed that bit.


I am bad at counting. You will need more than this. Something like 8 brown circles, 4 light brown ovals, four thermal lining circles, and two cotton batting circles. You could use four cotton batting circles if you want, but meh.

For the actual part that's holding the pot, sandwich a thermal circle and a batting circle between two brown circles. Make sure you remember which side the thermal lining is on: you want the order to be hot thing: thermal lining: cotton batting: hand.


Quilt somehow! The blog I was going off of quilted in pie pieces. This was certainly quick, but I didn't like the fact that quilting from the centre outwards left all kinds of strings in the middle of the potholder, or the fact that going from one edge to the other caused some unsightly puckering. It was too late at night for me to think up my own way though. Plus cutting circles with a rotary cutter is HARD.


For hand bits, cut your thermal linings in half!


Then, learn hand applique! I'm sure the internet will tell you how to do this. I learned from a book. Sorry.


applique four light brown ovals to four brown circles.


Then, learn how to hand embroider. I learned from here. In case you're wondering, I used a satin stitch.

Then, the hangy bits! Also ears! I just cut some 2 x 4 inch rectangles, folded them, sewed them, turned hem inside out, pressed them, and sewed over the seam. What's the big deal?

To piece together the final product, simply remember that everything you want on the outside should be on the inside. SO you what the thermal lining side of your potholding bit to be UP. Place the hangy bits with the loop (or fold) toward the CENTRE. place the appliqued and embroidered sides of your half circles FACE DOWN.


PIN IT. Then sew around the edges. You'll end up with two weird things that look like this.


Trim the seams as close as possible, and turn the potholders inside out. They'll still look a little weird.
But, once you press them again, they'll make a little more sense.
Sew around the circle one more time, and:You're done!

Personally, I'm really impressed. Especially because of all the emotional meltdowns and rummy hot chocolates I had while making these.

And yes, that IS a Jonas Brothers mug. But it's got a beer bottle stuck in it and I have no idea what to do about the situation but look at it all day every day.